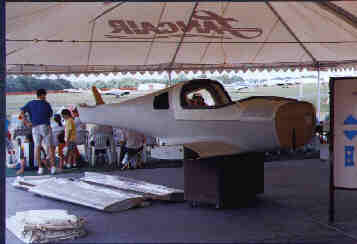
| In the Lancair Tent at Sun 'n' Fun, Saturday, 4/11/97.
Every Lancair winds up at the airport eventually, but this one started there... Rather than having the kit shipped from the factory in a huge crate this one was brought to Florida in the factory truck and made available for pickup at Lakeland Municipal Airport. It happens to be the 360 kit that they displayed there during the Sun 'n' Fun airshow. |
 |
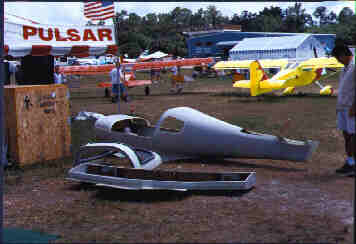 |
After the tent was taken down on Saturday, some parts waiting to be loaded.
While all that's seen here is the belly pan, the canopy frame, and the fuselage, the wings have already been loaded onto the trailer, and the truck is mostly packed. It took about 4 hours to get all the composite parts wrapped and loaded, along with the ten boxes of hardware, resins, glasscloth, aluminum, and other parts too numerous to include in a single paragraph. |
| Sunday morning (4/13/97) back in Fort Myers, waiting to unload.
We actually drove back Saturday night after loading, as it's only about a 3 hour trek from Lakeland to Fort Myers, but decided to wait for the light of day to actually start the unloading process. Needless to say there were more than a few turned heads on the interstate when this rig passed them by. |
 |
 |
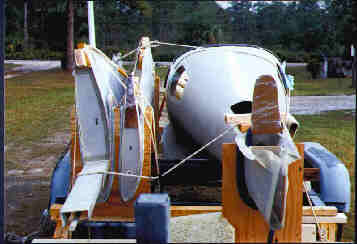
Plenty of padding, ropes, and binders to keep everything in place.
As you can see, we used a real preponderance of whatever it took to keep everything from moving on the trailer. And yes, that is a boat trailer, to which we added some 4x4 and 2x4 blocking, a factory supplied cradle (from a Lancair IV) to support the tail of the fuselage, and my own custom built cradles for the wings. |
| The cradles really did the job.
Here you get a bit clearer view of the pains that were taken to keep everything in place. As it turned out, nothing had moved during the journey, and we even managed to untie all the ropes. Ratchet-style binders were also utilized, so we had a very secure load. The only faux pas that was made was in the construction of the wing cradles... they were cut using the airfoil profiles from the prints and were supposed to hold the wings bottom-to-bottom and alternating inboard and outboard, leading edges down. Unfortunately they would have had to been built as an inboard cradle and an outboard cradle to get the bottoms facing each other. Think about it. I didn't. |
 |
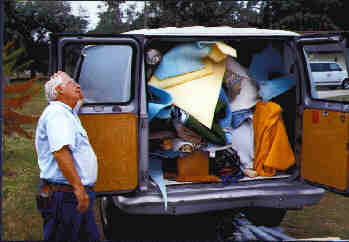 |
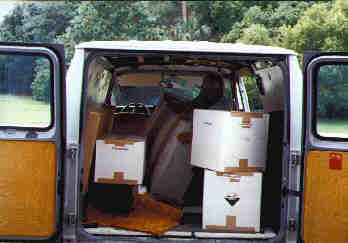
Cousin Chip dreading unloading the truck..
That wall of multi-colored foam, blankets, carpeting, and other packing materials hides all the boxes and individually wrapped composite components that filled the entire cargo area of the van. We had enough packing material with us to move a small house, and amazingly used the vast majority of it. |
| Down to the last few cartons.
All of the composite components have been unloaded and all that's left is to get out these last several boxes. In them we found all manner of goodies, from epoxy to AN hardware, tires, weldments and even an engine mount. The kit even included a pair of multi-binned 4-drawer parts cabinets to hold all the nuts, bolts, screws, washers, fittings, etc. |
 |
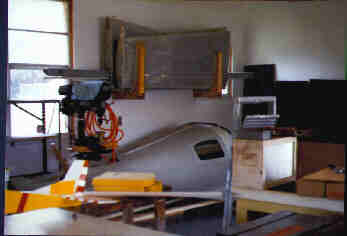 |
Places for the big parts.
If you look closely you'll see that the wings are back in their cradles, this time hung on the wall. The fuselage is actually sitting on a tricycle shaped dolly, supported by the tail cradle once again, and resting on the spar mounts at the front. There's plenty of room inside the fuselage to hold many of the longer parts, keeping them safely out of harm's way. You'll also notice that the shelving unit to the far left (in front of the window, next to the drill press) is empty. This photo was taken before the inventory of all the small parts had commenced, so none of that stuff is put away yet. |
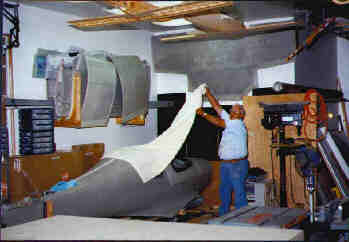
| Hmmm, what's under here?....
(Drum roll please............) |
 |
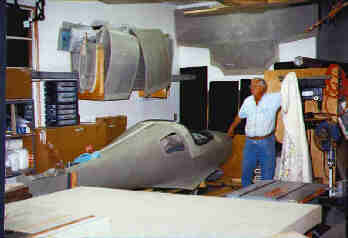 |
Ta-Da! It's all put away, Tuesday, 4/15/97.
Not only are the wings hanging from the wall, but the stub wing skins, ailerons and flaps are all hanging up there as well. The belly pan is also suspended high on the wall to the immediate right, Every nut, bolt, and rivet has been accounted for and there were just a few minor shortages thanks to backorders from outside sources... no problem with that though, as by the time I'll get to needing those parts they could well have put up a whole new factory to make them. (BTW, there was a wrong part shipped and is visible here... care to take a guess? Drop me a line and win a mention here for being the first to find it.)(Further BTW, it looks like there are some pretty observant folks out there... see who they are and when they posted what they found.) |